Great Scott Gadgets
Throwing Star Lan Tap Kit
Throwing Star Lan Tap Kit
Couldn't load pickup availability
The Throwing Star LAN Tap is a passive Ethernet tap, requiring no power for operation. There are active methods of tapping Ethernet connections (e.g., a mirror port on a switch), but none can beat passive taps for portability. To the target network, the Throwing Star LAN Tap looks just like a section of cable, but the wires in the cable extend to the monitoring ports in addition to connecting one target port to the other.
The Throwing Star LAN Tap is a kit for you to assemble.
Download the open source design files (made with KiCad).
Read about the history of the Throwing Star LAN Tap.
The following instructions will help you assemble and use your Throwing Star LAN Tap Kit. (Download these instructions for printing.)
Assembly
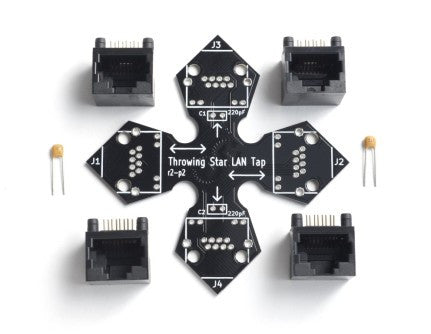
- Gather the components. You should have one Throwing Star LAN Tap printed circuit board, four Amphenol RJHSE5080 modular connectors, and two 220 pF capacitors with 0.1 inch lead spacing such as the Xicon 14050P2221KRC. You will also need a soldering iron, some electrical solder, and a pair of wire cutters.
- Insert the four modular connectors (J1, J2, J3, and J4) into the printed circuit board. Be careful that each of the leads extends through the circuit board before snapping the connector fully into place.
- Solder the eight leads of each connector.
- Insert the two capacitors (C1 and C2) through the circuit board. It is helpful to slightly bend the leads on the underside of the board so that the capacitors stay in place when the board is turned over.
- Solder both leads of each capacitor and clip off the excess with wire cutters.
- Clean the flux from the board. Depending on the type of solder used, you might need water, alcohol, or other solvents. A toothbrush can make this job easier. Allow the board to dry before use.
Usage
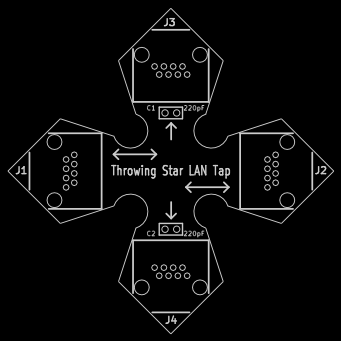
- Use Ethernet cables to connect the Throwing Star LAN Tap (J1 and J2) in line with a target network to be monitored.
- Use Ethernet cables to connect one or both of the monitoring ports (J3 and J4) to ports on one or two monitoring stations. Each port monitors traffic in one direction only.
- Use your favorite software (e.g., tcpdump or Wireshark) on the monitoring station(s) to capture network traffic.
Theory of Operation
The Throwing Star LAN Tap is a passive Ethernet tap, requiring no power for operation. There are active methods of tapping Ethernet connections (e.g., a mirror port on a switch), but none can beat passive taps for portability. To the target network, the Throwing Star LAN Tap looks just like a section of cable, but the wires in the cable extend to the monitoring ports in addition to connecting one target port to the other.
The monitoring ports (J3 and J4) are receive-only; they connect to the receive data lines on the monitoring station but do not connect to the station's transmit lines. This makes it impossible for the monitoring station to accidentally transmit data packets onto the target network.
The Throwing Star LAN Tap is designed to monitor 10BASET and 100BASETX networks. It is not possible for an unpowered tap to perform monitoring of 1000BASET (Gigabit Ethernet) networks, so the Throwing Star LAN Tap intentionally degrades the quality of 1000BASET target networks, forcing them to negotiate a lower speed (typically 100BASETX) that can be passively monitored. This is the purpose of the two capacitors (C1 and C2).
Like all passive LAN Taps, the Throwing Star LAN Tap degrades signal quality to some extent. Except as described above for Gigabit networks, this rarely causes problems on the target network. In situations where very long cables are in use, the signal degradation could reduce network performance. It is a good practice to use cables that are not any longer than necessary.